How To Integrate Stripe Payment Gateway With Node.Js And Express


In this post, we will learn “how to integrate Stripe payment gateway in our application using Node.js and Express.” I am going to create a basic app to make payments where users can submit payment in the testing environment using test card details and, you can change the environment just by changing tokens to production.
TO integrate stripe payment we need to follow steps.
1. Create Stripe account
To integrate the stripe payment gateway in our application first thing we required was a stripe account to getting started. You can create your account by clicking on the following links (Log in if you already have an account) Login or Register.
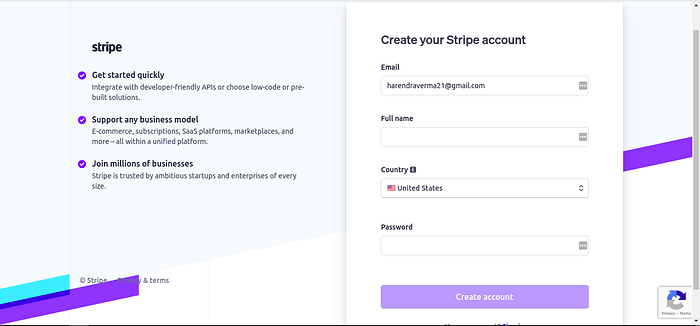
Stripe : Register
2. Get Tokens
You can get tokens by navigating to Developers -> API Keys from the sidebar of your dashboard.
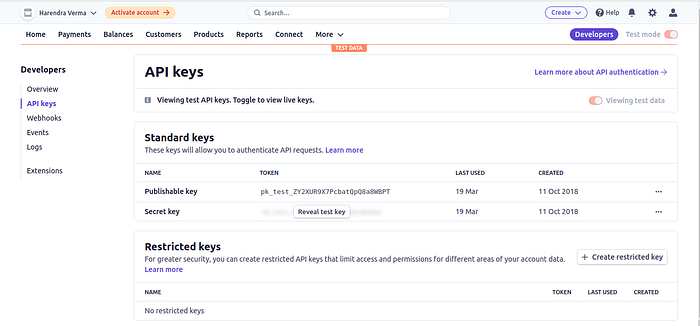
Stripe : Get Tokens
3. Code Setup
To start coding, we have to set up the directory structure of our application provided below.
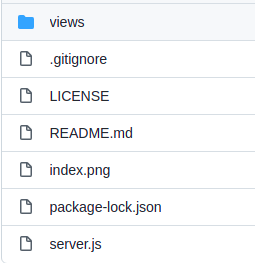
Application files
Create “server.js” file
This file is the main file for our server which loads all views and handle payment request.
const express = require('express')
const bodyParser = require('body-parser')
const path = require('path')
const stripe = require('stripe')('YOUR_SECRET_KEY_HERE')const app = express()
app.use(bodyParser.urlencoded({ extended: true }))app.set('view engine', 'ejs');
app.engine('html', require('ejs').renderFile);app.use(express.static(path.join(__dirname, './views')));app.get('/', (req,res) => {
 res.render('index.html');
})app.post('/charge', (req, res) => {
    try {
        stripe.customers.create({
            name: req.body.name,
            email: req.body.email,
            source: req.body.stripeToken
        }).then(customer => stripe.charges.create({
            amount: req.body.amount * 100,
            currency: 'usd',
            customer: customer.id,
            description: 'Thank you for your generous donation.'
        })).then(() => res.render('complete.html'))
            .catch(err => console.log(err))
    } catch (err) { res.send(err) }
})const port = process.env.PORT || 3000
app.listen(port, () => console.log('Server is running...'))
Code explanation — In the above code a simple express server was created and it is serving our application at port 3000. We are setting routes to serve our application.
app.get("/", (req, res) => {
  res.render("index.html");
});
The above code will render the main view page of the application.
app.post('/charge', (req, res) => {
    ****
})
This code will get all required parameters from post request and charge payment from stripe card and, then send a response of success or failure.
Create “card.js”
This file is used at the front end to validate card information entered by the user.
const stripe = Stripe('Publishable_key_here');
const elements = stripe.elements();var style = {
    base: {
        color: "#fff"
    }
}
const card = elements.create('card', { style });
card.mount('#card-element');const form = document.querySelector('form');
const errorEl = document.querySelector('#card-errors');const stripeTokenHandler = token => {
    const hiddenInput = document.createElement('input');
    hiddenInput.setAttribute('type', 'hidden');
    hiddenInput.setAttribute('name', 'stripeToken');
    hiddenInput.setAttribute('value', token.id);
    form.appendChild(hiddenInput);console.log(form)
    form.submit();
}form.addEventListener('submit', e => {
    e.preventDefault();stripe.createToken(card).then(res => {
        if (res.error) errorEl.textContent = res.error.message;
        else {
            console.log(res.token)
            stripeTokenHandler(res.token);
        }
    })
})
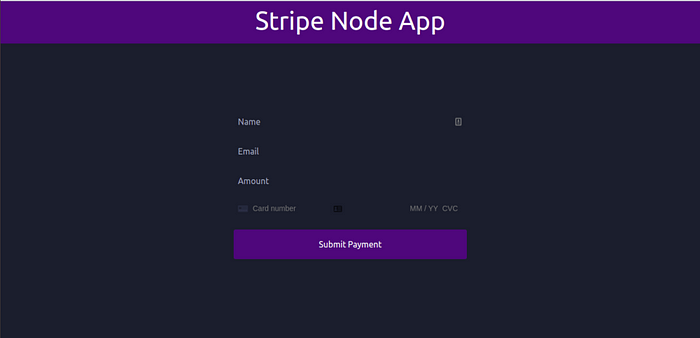
Create “index.html”
It is the main homepage of the application which is used to providing an interface to enter the required information to make payment.
<!DOCTYPE html>
<html lang="en">
  <head>
    <meta charset="UTF-8" />
    <meta name="viewport" content="width=device-width, initial-scale=1.0" />
    <meta http-equiv="X-UA-Compatible" content="ie=edge" />
    <link
      href="[https://unpkg.com/tailwindcss@](https://unpkg.com/tailwindcss@)^1.0/dist/tailwind.min.css"
      rel="stylesheet"
    />
    <title>Stripe Node App</title>
  </head>
  <body class="bg-gray-900">
    <nav class="bg-purple-900 h-20 flex justify-center">
      <h1 class="text-white text-5xl">Stripe Node App</h1>
    </nav>
    <div class="flex justify-center mt-32">
      <form action="/charge" method="POST" class="flex flex-col w-1/3">
        <input
          class="bg-transparent text-white p-2 h-10 mb-4"
          type="text"
          name="name"
          placeholder="Name"
        />
        <input
          type="email"
          class="bg-transparent text-white p-2 h-10 mb-4"
          name="email"
          placeholder="Email"
        />
        <input
          class="bg-transparent text-white p-2 h-10 mb-4"
          type="text"
          name="amount"
          placeholder="Amount"
        />
        <div
          id="card-element"
          class="bg-transparent text-white p-2 h-10 mb-4"
        ></div>
        <div id="card-errors" role="alert"></div>
        <button class="text-white bg-purple-900 p-4 rounded">
          Submit Payment
        </button>
      </form>
    </div>
  </body>
  <script src="[https://js.stripe.com/v3/](https://js.stripe.com/v3/)"></script>
  <script src="card.js"></script>
</html>
Create “complete.html”
This is the payment success page of our application that will show after payment is done.
<!DOCTYPE html>
<html lang="en">
  <head>
    <meta charset="UTF-8" />
    <meta name="viewport" content="width=device-width, initial-scale=1.0" />
    <meta http-equiv="X-UA-Compatible" content="ie=edge" />
    <link
      href="[https://unpkg.com/tailwindcss@](https://unpkg.com/tailwindcss@)^1.0/dist/tailwind.min.css"
      rel="stylesheet"
    />
    <title>Completed</title>
  </head>
  <body class="bg-gray-900">
    <nav class="bg-purple-900 h-20 flex justify-center">
      <h1 class="text-white text-5xl">Stripe Node App</h1>
    </nav>
    <div class="flex flex-col items-center mt-32 text-white text-2xl">
      <p>Thank you for your generous donation.</p>
      <p>Your payment has been received.</p>
      <a href="/"
        ><button class="bg-blue-700 rounded p-4 mt-3">Return</button></a
      >
    </div>
  </body>
</html>
4. Change tokens
Change your token in views/card.jsand server.js the file.
5. Install Packages
This app is using many packages to create a server and accepting payment. So, to install used packages run the below command
npm i body-parser ejs express nodemon stripe
6. Serve Application
To serve your application to test, we need to run thenode server.js in the project root and this will launch a local server running at http://localhost:300. Now we need to open http://localhost:3000 with our favorite browser to make a payment.
7. Test card details
Name on Card — Harendra
Card Number — 4242424242424242
CVC — 123
Expiration Month — 12
Expiration Year — 2030
Github — https://github.com/harendra21/stripe-nodejs
Summary
In this post, we have learned about Stripe payment gateway create an account, get tokens and integrate it with node js. I have provided test card details to start testing in the test environment. I hope this will help if you are integrating stripe payment with the node js application. If you face any problem please feel free to ask any query.


